Sunday, August 11, 2013

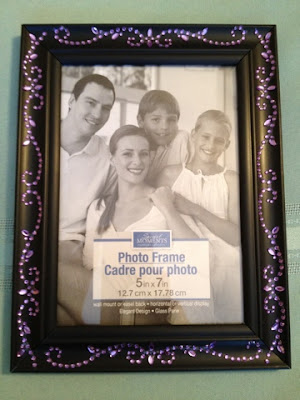
Easy Blinged-Out Photo Frame: under $5 per frame!

DIY Blinged-Out Photo Frames

Part of the reason that I've been so MIA on my blog entries this summer is that I was VERY busy for awhile in preparation for my sister's wedding! It was an amazing day!


The following project was actually her inspiration, and I assisted her in creating them. At her bridal shower and wedding, she wanted to showcase a feature called "Meet the Maids." Each frame showed a photo of one of her bridesmaids, along with a paragraph about the special relationship she shares with her. It was a really touching and cute addition to the events, and frames cost less than $5 each to make! Can't go wrong with that!

Supplies:

1. "Bling on a roll" (first photo below)- this had adhesive on the back of miniature rhinestones in a continuous roll that could be cut to size. Can be found at a craft store like A.C. Moore. Each roll was on clearance and cost under $3 - score!

2. 4x6 photo frames with sides wide enough to accomodate the "bling" that you purchase. The black "wooden" frames were purchased at Dollar Tree!


 Instructions:

1. Measure each side of your photo frame. 

2. Cut four strips of your "bling on a roll" to match the sizes of each side you are decorating.

3. Very carefully lay down and adhere your "bling" to each side of your photo frame. 

Ta-da!

The photo below shows the finished product - the frames WITH the personalized notes about each bridesmaid displayed (that portion of the project not part of this blog post). This very simple DIY project really added a special touch to otherwise boring photo frames.   


Ribbon Topiary:)


The inspiration for / instructions you will need to re-create the ribbon sphere portion of this craft is going to be found by reading up on how I make my ribbon wreaths: here.

The list of supplies and other steps in making this topiary can be found below.

Supplies:

1. Small styrofoam ball (I honestly don't remember what size I got, it was so long ago! I'm sorry!- about 2x the size of a baseball).

2. Various ribbon in whatever theme/colors you'd like. Grosgrain ribbon is best and I recommend you avoid sheer ribbon. 

3. Mini pail / decorative container for the base of your topiary. Mine is a $1 metal bucket from the dollar bin at Target.

4. Fake grass, paper or plastic - this was easy to find around Easter.

5. Wooden dowel, 5/8'' or 1/2'' thick and about one foot in length (can be cut to your needs).

6. Acrylic paint and a medium size brush

7. Styrofoam block (enough to stick in the container you have chosen).

8. Super glue

9. Dressmaker pins

Instructions

1. Take the wooden dowel and poke a hole in the bottom center of your styrofoam ball. Take the dowel out of the hole. 

2. Follow the technique for creating the ribbon loops (4'' long) and pinning them on the ball by referencing my previous post: here. Do not cover the hole that you made.

3. Use desired acrylic paint to paint your wooden dowel and let it dry.

4. When ball is covered, put a couple drops of super glue in the hole and push the wooden dowel into the hole.

5. Cut your styrofoam block to fit snugly inside your pail / canister / base for your topiary. 

6. Put some super glue in the bottom of the container and push the block on top of the glue. Let dry for one minute.

7. Take the dowel (with ball already attached on other end) and push a hole into the center of your styrofoam base. You may remove the dowel and put some glue inside there before putting the dowel back in permanently.

8. Use fake grass to hide styrofoam / fill your canister and give it the look of grass at the base of your topiary.